Carnitas

Home made Carnitas Tacos.

The Best Homemade Carnitas

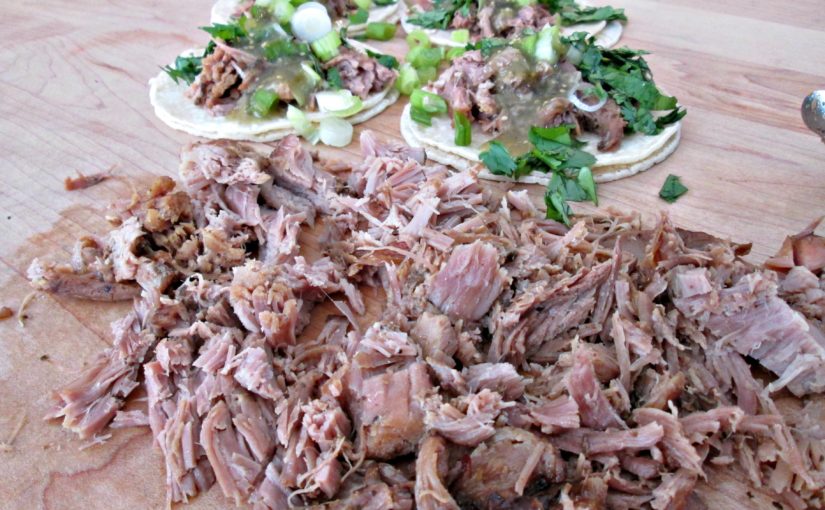
One thing I think we can all agree with, we love tacos and this Carnitas recipe is no exception. If you don’t know what that means, I’m talking about tender yet crispy thin pieces of pork meat that have been cooked to perfection. Some of the busiest cities in Mexico and in the United States have street vendors cranking out these little gems like they’re going out of style. Folks can’t get enough and I’m going to show you how to do it better than any other online recipe.

Raw bone in pork shoulder roast with the skin.

Misconceptions about Carnitas

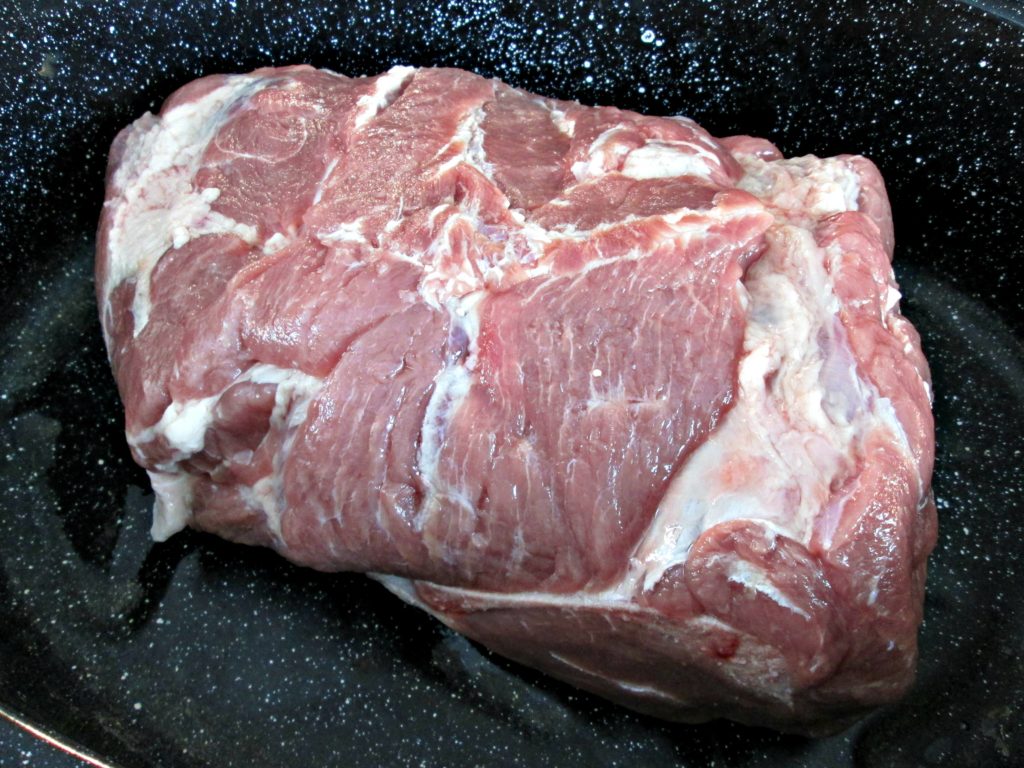
The very definition of the Latin word, “Carnitas” translates as braised or roasted pork served shredded in small pieces. Some people seem to think that means that the meat should be cut into small portions before cooking it. Nonsense. It’s the final product that needs to be chopped up. Some of the most famous cookeries in Mexico braise all of the meat in large portions. The only reason to cut the pork into small pieces would be to fit in your pot, if your home pot isn’t big enough. Also, you won’t be needing any additional lard to cook this recipe because this pork shoulder is marinated first, then baked and roasted in it’s own rendered fat.

Carnitas marinade.

Carnitas Marinade

As I already mentioned, Carnitas is braised or Roasted pork. In Mexico and most online recipes, the pork is cooked in large amounts of lard first, then all of the other ingredients are added half way through or more towards the end of the cooking. Marinating the meat first, then baking with the slow and low method, accomplishes several things; it flavors, tenderizes and allows you to free up your time instead of baby sitting the stove for several ours. If I want tacos for lunch, I get this started the night before and it cooks itself until I get up the next day. Not to mention, this process cooks the meat perfectly and I prove that in the video tutorial down below.

Fully Cooked Carnitas for tacos and burritos.

Carnitas Final Steps

This Carnitas recipe will roast for 12 hours in the oven but it’s not finished yet. Although you can achieve the tenderness from the slow and low method, you’re still going to want to add some more flavor and a bit of crispiness to the meat. This can be done by adding the final ingredients, orange juice, coca-cola, bay leaves and cranking the oven up several notch’s. After you add those ingredients you want to bake the pork with the lid off for another hour. Set the oven to 350 degrees Fahrenheit, cut spin and rotate the meat before and every half hour to reach its full potential. You’ll understand better, once you watch my tutorial.

If you’re interested in other taco recipes look into my Chipotle Chicken, Barbacoa, Street Tacos(Cabesa), Fish Tacos and my Taco Salad recipes. I’ve got two recipes for the Greek Tacos too; Pork Gyros and my American Greek Gyro recipe.

Carnitas Ingredients

10 lbs Pork Shoulder

1/4 cup Garlic Infused Oil
2 tsp Salt
1 tsp Black Pepper
1 tbsp Oregano
1 tbsp Cumin
2 tbsp Chipotle Pepper in Adobo Sauce
2 tbsp Sweetened condensed milk
1/2 tsp Ground Cloves

1/2 cup Orange Juice
1/2 cup Coca Cola
2 Bay Leaves
1 Onion

Bake at 200 degrees Fahrenheit for 12 hours. Cut pork into Pieces. Add Orange Juice, Cola and Bay Leaves to the rendered fat and cut pieces of meat. Bake at 350 degrees Fahrenheit, with the lid off for 30 minutes. Stir the mixture and bake for 30 more minutes, then remove from oven and shred.

Baby Back Ribs Tin Foil Dinner

Fun Baby Back Ribs Dinner

Tin foil dinners were a regular thing for me, growing up. I was a Boy Scout and without mommy and daddy around to cook for me, I had to throw something together that could just be cooked by campfire. I didn’t like hot dogs so hamburger and vegetables was the next alternative. Well, now that I’m full grown, I don’t want little burned bits of under seasoned hamburger. I want ribs and an assortment of vegetables that any gourmet chef would be proud of and this is what I came up with.

Raw Baby Back Ribs seasoned with Kosher Salt, Black Pepper, Cumin and Blackened Seasoning.

The Best Baby Back Ribs

If you want great Baby Back Ribs, they’ve got to be seasoned. We’ve all got our own specific tastes but the key is to lay it on there thick. In my opinion, the only way you can over season ribs is if you add too much salt. That’s why I use Kosher. It’s light, fluffy and a few pinches, spread evenly, seasons the meat perfectly. There’s a variety of different seasoning I use for different recipes but the key is to cook them slow and low, no matter what you decided to season your ribs with. Cook them over some hot coals, in a smoker, barbecue grill or in the oven like I do and the slow and low method will never do you wrong.

In this recipe I use Cumin and Blackened Seasoning. That means there is Smoked Paprika, Garlic and Onion Powder and a few earthy ingredients that really make pork pop. I posted a recipe for Blackened Seasoning a while back if you’d like to put together some for your self.

Waxy potatoes, sweet peppers, asparagus and carrots.

Veggies and Baby Back Ribs

One pairing that is as sure as death and taxes is vegetables in tin foil dinners and this Baby Back Ribs recipe is no exception. Vegetables that are hard and take longer to cook are the best to use because it takes a few hours for the pork to cook. I chose some small waxy potatoes, carrots, sweet peppers and asparagus. Why I didn’t think to put onion in there, until this exact moment, I’ll never know. Truthfully I was trying to film 2 videos at the same time. 2 hours of cooking time gave me nothing to do so I must have racked my brain trying to get a second video done. Anyway, where was I… oh yeah, the vegetables. They will turn out perfectly with just a little olive oil and salt and pepper.

Baby Back Ribs Tin foil Dinner Ingredients:

1 rack Baby Back Ribs
Carrots
Asparagus
Small Waxy Potatoes
Small Sweet Peppers
Cumin
Blackened Seasoning
Kosher Salt and Pepper
Olive Oil

Cook at 300 degrees Fahrenheit for 2 hours and then expose the ribs and kick up the heat 50 degrees. Bake a second time, with barbecue sauce if you’d like, for 20 minutes.

I’m not listing all of the exact amounts because it’s not necessary. I just bought a small bag of each item and just eye balled the seasoning and I’m confident that you can do the same thing and be proud of your self. Just follow the instructions in the Baby Back Ribs Tin Foil Dinner video tutorial and I’ll show you exactly how to make this.

Pork Rinds

The Best Pork Rinds

Truthfully, making Pork Rinds isn’t all that difficult to do but it is quite a time consuming process and one that you might rather avoid if you don’t mind buying a bag of fried pig skins or cracklings, instead.  I say that, mostly, because you don’t save any money, doing it yourself, and cooking these fresh doesn’t seem to improve the taste or flavor, in my opinion.  I like to eat Pork Rinds as much as anyone, so don’t take my thoughts the wrong way.  Just know that I’d rather just buy a premade bag instead of making them myself, next time(unless I have skin I don’t want to go to waste).  So if nothing else, you can at least learn how it’s done and hopefully enjoy this post, recipe and the work I put in to making the Pork Rinds video.

Purchasing Skins for Pork Rinds

As you can see, in the photo above, I purchased my Skins, to make Pork Rinds, from my local Asian Market.  Skins usually come from the Belly side of the pig, where the the bacon is removed.  So there’s generally a ton of fat associated with the cuts.  I paid $2 dollars a pound, for this package, so I didn’t really save any money vs. buying a premade bag of Pork Rinds.  But, because the fat was already removed I didn’t get charged for all the extra weight.  Though, I’m sure if it were still attached, the price would’ve been altered accordingly.  Regardless, you should be able to purchase pig skin from any butcher that sells pork.

Making Pork Rinds

As I mentioned before, making Pork Rinds is time consuming and quite tedious.  Even though the majority of the fat content was removed from the skins, the skin needs to be boiled and scraped to ensure that all of the fat is gone.  And it’s best to boil the skins whole, before cutting and slicing them into portions.  This way you can do it in large sheets instead of individual 1 inch pieces.  Removing the fat, completely, helps to aerate the skin when it bakes and helps the Rinds fluff up more when they’re frying.  In the video, I Boil the Pork Rinds for 30 minutes, strain and then baked them, on low, for approximately 4 hours before frying.  Then once they are removed from the oven, they can be dropped in a deep fryer set at 350 degrees Fahrenheit, for 2 minutes.

Fried Pork Rinds

A few things you need to consider, when making Pork Rinds, is that there are several different ways you can screw these up.  If you’ve ever bitten into a pork rind that just about broke your tooth or was just too hard to chew, then you need to pay attention to a few things.  First, cut off tough and discolored edges that seem dried out and pleathery.  Second, again, be sure to scrape out the fat.  And third, be sure to remove all of the pieces that that didn’t puff up in the fryer.  You follow those three easy steps and all of your teeth will stay intact.

As far as seasonings go, anything with onion and garlic powder in them is generally a good way to go but you can use ranch powder, adobo, pico de gallo or just plain old salt and pepper.

Pork Rinds Ingredients:

2 lbs Pig Skin
2 Quarts Water
1/4 cup Salt
Oil for Frying
You’re Favorite Seasoning

Be sure to remove all of the fat from the skin, boil the skin for 30 minutes, bake the skins on low for 2 to 4 hours and
deep fry the skins at 350 degrees Fahrenheit for approximately 2 minutes. Place the Pork Rinds on paper towels and
season with your favorite seasoning or salt.